This blog is dedicated to the food that comes out of my kitchen. I'm not a trained chef; I'm a doctoral student who cooks for fun. I use whatever I can find in my apartment, the grocery store or from friends. I try to keep things affordable and fun!
Search This Blog
Monday, January 20, 2014
Peppermint Chocolate Snow caps
I needed cookies to take to a Farm Bureau Christmas Party. My requirements were that the cookie be something chocolate and something festive, meaning I wanted something with peppermint and chocolate. When I was testing out this recipe, the washing machine repairman was here replacing the door mechanism in my washer. So I whipped them up while he was working and sent him on his way with a plate full of cookies and a smile. The whole apartment smelled like warm chocolate and peppermint, a wonderful combination on a cold winter day. These cookies were easy and fun and the dough kept really well in the freezer. In fact, tomorrow I'm going to defrost that dough and make a few more of these cookies for a friend. You can make these cookies with as much peppermint or as little peppermint as you like; I happen to life peppermint a lot! Reminds me of the crisp smell of the outside and the warmth of hot cocoa. Give these cookies a shot and you'll be pleasantly surprised at how easy and tasty they are. While you're at it, make a double batch and put the other half in the freezer. Take them out when you need a lift on a cold, wintry day. The recipe came from the blog,The Nest Chapter .
Ingredients:
1 1/2 cups all purpose flour
1 1/2 teaspoons baking powder
1 1/2 cups milk chocolate chips
6 tablespoons butter, softened
1 cup granulated sugar
2 eggs
1 1/2 teaspoons vanilla
1/2 teaspoon mint flavoring (or a bit less if you want a milder flavor)
1/4 tsp salt
Powdered sugar for rolling
Directions:
Preheat oven to 350 degrees. In a double boiler melt the chocolate chips and butter. Remove the chocolate and butter from the heat. Beat in granulated sugar until combined, then beat in eggs, vanilla and mint flavoring. Add in flour, baking powder, and salt, stirring until combined. Shape dough into 1 inch balls using a small ice cream scope. Roll balls in powdered sugar. Place on a non-stick baking sheet about 2 inches apart. Bake in preheated oven for 9 1/2-12 minutes. 9 1/2 minutes make a soft cookies, so I suggest 9 1/2. Cool for a few minutes on a baking sheet.
Makes about 40 cookies.
Fruitcake bars (no rolling your eyes, these are DELICIOUS)
I have never in my life had fruitcake, NEVER! I had heard the same horror stories that I'm sure everyone else has heard. Fruitcake is awful. Fruitcake is hard. Fruitcake bounces. Fruitcake is similar to a Twinkie, they never rot. Avoid fruitcake at all cost. Well, let me tell you, THOSE ARE LIES!!!! LIES I TELL YOU! This fruitcake bar recipe if from Taste of Home and it is delicious and amazing. If your memory is tainted by bad fruitcakes of the past, please put away your demons and try these bars. They are moist, fruity, nutty and mouthwatering. These may be my new Christmas wooing cookie. I'll be honest, making these cookies was a push from Joy my upstairs neighbor, who claimed that she loved fruitcake. I thought she was crazy. Reluctantly I made these bars for her as a Christmas present and they were delicious. Give them a try!
Since I had never made these before, I followed the recipe with fidelity and let me tell you, I wouldn't change a thing. The only major change I made was to toast the walnuts, which made them taste rich and took away the slightly bitter bite.
Ingredients:
3/4 cup butter, softened
1 3/4 cups packed brown sugar
3 eggs
1 Tbsp vanilla extract
1 1/2 cups all-purpose flour
3 cups, toasted, chopped walnuts
1 1/2 cup chopped candied pineapple
1 3/4 cups red and green candied cherries, halved
2 cups pitted dates, chopped
Directions:
First, turn the oven to 350 degrees. Spread the walnuts out on a cookie sheet and bake them until they smell fragrant, anywhere from 8 to 15 minutes. Check on them constantly and make sure to mix them around. You don't want them to burn. When they are done, remove them from the oven. Wait until they cool a bit and then chop. Then, in a large bowl, cream the butter and brown sugar until light and fluffy. Add eggs, one at a time, beating well after each. Stir in vanilla. Add flour and walnuts; mix well. Add some of the pineapple, cherries and dates, mix them through thoroughly. Spread evenly into a greased 9x13 inch baking pan. Sprinkle with pineapple, cherries and dates; press lightly into dough.
Bake at 325° for 45-50 minutes or until lightly browned. Cool on a wire rack. Cut into bars. Yield: 8 dozen.
Since I had never made these before, I followed the recipe with fidelity and let me tell you, I wouldn't change a thing. The only major change I made was to toast the walnuts, which made them taste rich and took away the slightly bitter bite.

Ingredients:
3/4 cup butter, softened
1 3/4 cups packed brown sugar
3 eggs
1 Tbsp vanilla extract
1 1/2 cups all-purpose flour
3 cups, toasted, chopped walnuts
1 1/2 cup chopped candied pineapple
1 3/4 cups red and green candied cherries, halved
2 cups pitted dates, chopped
Directions:
First, turn the oven to 350 degrees. Spread the walnuts out on a cookie sheet and bake them until they smell fragrant, anywhere from 8 to 15 minutes. Check on them constantly and make sure to mix them around. You don't want them to burn. When they are done, remove them from the oven. Wait until they cool a bit and then chop. Then, in a large bowl, cream the butter and brown sugar until light and fluffy. Add eggs, one at a time, beating well after each. Stir in vanilla. Add flour and walnuts; mix well. Add some of the pineapple, cherries and dates, mix them through thoroughly. Spread evenly into a greased 9x13 inch baking pan. Sprinkle with pineapple, cherries and dates; press lightly into dough.
Bake at 325° for 45-50 minutes or until lightly browned. Cool on a wire rack. Cut into bars. Yield: 8 dozen.
Marshmallow Chocolate Cupcakes
In November (yes, yes, I know it's been a while) I made cupcakes for a good friend's birthday. Her name is Joy and she's my upstairs neighbor, along with her daughter, Nicole. It's a long story but I yelled at them when they were moving in and made up for it with brownies. Since then, we've become very good friends who share our struggles over coffee and my baked goods. Joy makes a killer homemade chicken noodle soup and is a respected baker in her own right (she ran/runs a catering business when she's not masquerading as a doctoral student). Together though, over strong coffee and baked goods, we serve as each others sounding boards, idea generators and sometimes just a place to vent or enjoy the silence.
Her birthday was in November and I decided to go simple but delicious for her birthday. She enjoys chocolate just like most of us and I figured what goes better with chocolate than marshmallow... The answer is NOTHING! So Marshmallow Chocolate Cupcakes were born as a birthday present. This recipe is unique, I would suggest making this recipe on the same day that you make the Kahlua Meringues because the frosting for these cupcakes doubles as the meringue topping!
So my normal chocolate cake recipe doesn't work for these cupcakes, it's too flaky and falls apart in cupcake form. Therefore, I use a regular old box mix cake with some spruced up touches, a delicious filling, and knock your socks off frosting!
Ingredients:
Cake
1 Betty Crocker Dark Chocolate cake mix
oil called for on package
coffee, substituted for the water, as called for on the package
eggs as called for the package
Filling:
1 package of Chocolate pudding mix (you can choose the flavor, I chose chocolate for a richer cupcake)
milk as called for on pudding package
1/2 tsp coconut extract
Frosting:
2 large egg whites (don't use the already separated kind that you get in a box, they don't fluff right)
3/4 cup white sugar
1/4 tsp or large pinch of cream of tarter (this makes the egg whites hold the whipped air and stay fluffy)
1/4 tsp vanilla extract
Directions:
Grab a Betty Crocker Dark Chocolate cake mix and pour it into a bowl. Then, instead of water.... here come the secret, SHHHHHH... instead of water, add STRONG coffee (espresso would work if you don't make your coffee like I do [thick, black sludge that a spoon stands up in] or instant coffee if you must). Trust me on this, the chocolate taste is magnificent with this added touch. Then add the eggs and the oil as called for on the package. Mix it according to box directions, put cupcakes liners in a cupcake pan, scoop the batter into the pans and bake for the time on the package. Then let the cupcakes cool, I know it'll be tempting, but back off and let the cool.
While the cupcakes are cooling, mix up the filling. Add the pudding mix to a bowl, the 1/2 tsp of coconut extract and the milk. Mix according to the directions on the package. Let the pudding set up while the cupcakes cool. When the pudding cools and the cupcakes are cool, put the pudding into a Ziploc bag and cut a small tip off one of the ends, this will serve as a pastry bag.
When the cupcakes are cool, use the Ziploc bag to fill the cupcakes. To fill a cupcake, take either a knife or a cupcake punch, and make a hole in the cupcake. Fill the hole with the filling. Make sure that the filling comes to the top of the cupcake, but not over the top, just make it even with the cake.
When you're ready to frost, make the frosting as follows. Place a shallow pot on the stove with about 4 inches of water, then place a bowl over the water pot. A double boiler. In the bowl over the simmering water, add the egg whites and sugar. The idea in doing this is that you "cook" the egg whites and dissolve the sugar. So with that in mind, stir constantly and bring the egg whites up to warm. I define warm as warm to the touch. When you touch the egg whites, the "grit" of the sugar should be gone. Think silky smooth texture.
So once your egg whites and sugar are warm and silky take the top bowl off the heat and bring to beat the egg whites with a mixer. I prefer to do this in my stand mixer because it's nice to be able to turn the mixer up as the egg whites fluff and be able to walk away. If you don't have a stand mixer, slowly increase the speed while mixing well. As the mixture begins to fluff, add the cream of tarter and the vanilla extract. The mixture will get very white, very fluffy and very glossy. In order to tell when the marshmallows are done, take a beater and flip it upside down. If the the peak holds its shape, then your meringues are done! (hint, this is a marshmallowy/meringue type frosting. Technically it's a meringue, but the texture is more marshmallowy) GENTLY take a spatula and put the meringues in the pastry or Ziploc bag. If you're using a pastry bag, a large star tip makes the pretty shape. Frost the cupcakes with a pretty pattern and place them on a cookie sheet. Turn the broiler on in your oven or used a kitchen torch and gently brown the meringues. Don't take your eyes off these meringues or you will burn them and burnt things taste bad!
These cupcakes are moist, chocolately, and the frosting tastes like a big marshmallow! Yumm!
Kahlua Meringues
So it's been a while since I updated the blog because I'll be honest, sometimes all the darn writing I have to do pushes updating the blog to the way, far back burner of my life. Especially around the holidays where I try to spend as much time as I can with my family and friends. So now that the writing is at least at manageable proportions, I can spend some time updating this blog with all my delicious recipes.
This recipe kind of came about by accident. In a bit, I will post the recipe for Marshmallow chocolate cupcakes, which I made for a friend's birthday; it turns out that the first frosting recipe I made makes a TON of frosting. So me being the person I am, I mixed in a bit of Kahlua and made these absolutely tasty little pieces of heaven.
Don't be scared of meringues, just don't try to make them on the rainiest, humid day of the week. Pick a nice, dry day and then make these pieces of heaven. I really like to make them towards the evening and then let them sit in the oven overnight; they are wonderful with or even in a cup of coffee. Flavor them with whatever flavor you like, be creative, use a little food coloring; PLAY, meringues are very fun!
Besides the rule of not making these on the rainiest day of the year, make sure that there are NO YOLKS in your egg whites. Cracking eggs without getting the yolk into the white is probably the biggest mistake people make. If you get even a nano drop of yolk into your egg whites, you're whites won't get fluffy and puff up, which makes sad, flat meringues. So armed with your best set of hands and a nice sunny day, begin your easy meringue journey.
Ingredients:
3 large egg whites (don't use the already separated kind that you get in a box, they don't fluff right)
3/4 cup white sugar
1/4 tsp or large pinch of cream of tarter (this makes the egg whites hold the whipped air and stay fluffy)
1 to 2 tbsp of Kahlua (pick 2 if you like the flavor of Kahlua, 1 if you're not sure)
food coloring if you like
Pastry bag or Ziploc bag
Star tip
Directions:
Preheat the oven to 350 degrees. Place a shallow pot on the stove with about 4 inches of water, then place a bowl over the water pot. A double boiler. In the bowl over the simmering water, add the egg whites and sugar. The idea in doing this is that you "cook" the egg whites and dissolve the sugar. So with that in mind, stir constantly and bring the egg whites up to warm. I define warm as warm to the touch. When you touch the egg whites, the "grit" of the sugar should be gone. Think silky smooth texture.
So once your egg whites and sugar are warm and silky take the top bowl off the heat and bring to beat the egg whites with a mixer. I prefer to do this in my stand mixer because it's nice to be able to turn the mixer up as the egg whites fluff and be able to walk away. If you don't have a stand mixer, slowly increase the speed while mixing well.
As the mixture begins to fluff, add the Kahlua and the cream of tarter. The mixture will get very white, very fluffy and very glossy. In order to tell when the meringues are done, take a beater and flip it upside down. If the the peak holds its shape, then your meringues are done!
GENTLY take a spatula and put the meringues in the pastry or Ziploc bag. If you're using a pastry bag, a large star tip makes the pretty shape. If you're really creative, you can stripe the bag and do all types of fun things to make these pretty. I'm not that creative and I'm more into function, so these are just white. Take a cookie sheet and cover it in parchment paper. Then pipe out the stars.
Once you've piped out all the stars (hint to this: squeeze the pastry bag to get the right amount of meringue and then release the bag before you pull the bag up), place the cookie sheets with the meringues in the oven and then turn the oven off! Yes, trust me, turn the over OFF! Don't open the oven door again until morning or for at least 8 hours. TRUST ME, DON'T OPEN THAT OVEN DOOR! If you open the door, the heat rushes out and your meringues are gooey, not crisp. Your patience will be rewarded!
So now that morning has come, open the oven, GENTLY peel off your meringues and try not to eat them all! If you take sugar in your coffee, add a few meringues to your coffee and enjoy! The crisp on the outside, delicate on the inside little puffs are heavenly!
Wednesday, October 30, 2013
Champagne Cupcakes
So my friend Helen and I decided to hold a Ladies Day for a bunch of friends. We had a friend come and share her Pure Romance business with us. It was a fun and educational day. It was also a great day to get together with friends that I don't see nearly often enough, catch up on our lives, and share in a little laughter. Helen and I are both great cooks, so the food was delicious. We had Buffalo Chicken Dip, Spinach Dip, fun colored drinks with umbrellas, cucumber with hummus, and more food than an army could eat. We made a great dent in it and everyone went home happy. I was in charge of making cupcakes and after being inspired by a drink at a restaurant in Bellefonte called The Smashing Pumpkin, I decided to try to make a cupcake version of that, as well as Champagne Cupcakes. Women occasionally need pampered and this was going to be our day. My Smashing Pumpkin Cupcake needs some reworking, but it'll be appearing on the blog soon. However, the Champagne Cupcake recipe that I used from Sprinkle Bakes, is a wonderful recipe and I used the cake and butter cream recipe, but I made some changes to the filling recipe. I used a sweet champagne, I used Cupcake Vineyards Prosecco. I chose this champagne after much staring and reading all the labels of all the sparkling wine on the shelves. I felt that the hints peaches, nectarines, and the fruity burst would be perfect in cupcakes. Turns out, I'm right. So chose a champagne or prosecco that you think could be good in a cupcake because you cook down the alcohol, which will enhance the flavor. I made some changes to the filling recipe, for some reason, I thought it tasted weird when I made it from the original recipe, so the few changes I've made are here. If you're looking for an easy but decadent, show stopping cupcakes, these are it!
Cake:
1/2 cup butter softened
1 cup granulated sugar
2 eggs
1 tsp vanilla
1 3/4 cups flour
1/2 tsp baking soda
1/4 tsp baking powder
1/4 tsp salt
1/2 cup sour cream
1/2 cup champagne, processco, or sparkling wine
Preheat oven to 350 degrees.
In the bowl, cream together butter and sugar until light and fluffy. Add vanilla and mix. Add eggs one at a time beating well after each addition. Mix together flour, baking soda, baking powder and salt, set aside. In a medium sized bowl, whisk together 1/2 cup champagne and 1/2 cup sour cream (mixture will fizz and bubble a little). Add flour and champagne mixture alternately, beginning and ending with flour. Batter will be thick.
Fill cupcake papers 3/4 of the way to the top of the liner with batter. Bake for 17-22 minutes. Set aside.
Champagne Pastry Creme Filling:
1/2 cup heavy cream, divided
1/2 cup champagne or prosecco
2 tbsp cornstarch
5 tbsp granulated sugar
1 whole egg
2 tbsp unsalted butter
In a medium bowl, whisk cornstarch in 1/4 cup of heavy cream. Combine the remaining heavy cream, sugar and 1/2 cup champagne in a saucepan; bring to a boil then remove from heat.
Beat the whole egg into the cornstarch/heavy cream mixture. Pour 1/3 of boiling champagne mixture into the egg mixture, whisking constantly so the eggs do not cook. Return the remaining champagne/heavy cream mixture to a boil. Pour in the hot egg mixture in a stream, whisking constantly until the mixture thickens. Remove from heat and beat in the butter.
Cut a divot into the top of each cupcake and fill with champagne cream. Fill so that the filling is almost level to the top.
Champagne Frosting:
1 cup plus 1 tbsp. champagne or prosecco
2 sticks of butter softened
2 1/2 cups confectioners' sugar
Place 1 cup of champagne in a small saucepan. Simmer over medium-high heat until reduced to 2 tablespoons. Transfer to a small bowl or condiment cup and allow to cool.
In the bowl of a stand mixer fitted with the whisk attachment, cream softened butter and powdered sugar together. Once the frosting is thick and fluffy, pour in the reduced 2 tbsp. champagne plus 1 tbsp. champagne from the bottle and mix well.
Decorate with fun sprinkles... or take them to your party and bring several small bags of Pop Rocks. Before each guest takes a cupcake, sprinkle them with Pop Rocks. This will simulate the fizz that champagne has! Guests gets a sweet treat with a surprise fizzzz!
.jpg)
1/2 cup butter softened
1 cup granulated sugar
2 eggs
1 tsp vanilla
1 3/4 cups flour
1/2 tsp baking soda
1/4 tsp baking powder
1/4 tsp salt
1/2 cup sour cream
1/2 cup champagne, processco, or sparkling wine
Preheat oven to 350 degrees.
In the bowl, cream together butter and sugar until light and fluffy. Add vanilla and mix. Add eggs one at a time beating well after each addition. Mix together flour, baking soda, baking powder and salt, set aside. In a medium sized bowl, whisk together 1/2 cup champagne and 1/2 cup sour cream (mixture will fizz and bubble a little). Add flour and champagne mixture alternately, beginning and ending with flour. Batter will be thick.
Fill cupcake papers 3/4 of the way to the top of the liner with batter. Bake for 17-22 minutes. Set aside.
Champagne Pastry Creme Filling:
1/2 cup heavy cream, divided
1/2 cup champagne or prosecco
2 tbsp cornstarch
5 tbsp granulated sugar
1 whole egg
2 tbsp unsalted butter
In a medium bowl, whisk cornstarch in 1/4 cup of heavy cream. Combine the remaining heavy cream, sugar and 1/2 cup champagne in a saucepan; bring to a boil then remove from heat.
Beat the whole egg into the cornstarch/heavy cream mixture. Pour 1/3 of boiling champagne mixture into the egg mixture, whisking constantly so the eggs do not cook. Return the remaining champagne/heavy cream mixture to a boil. Pour in the hot egg mixture in a stream, whisking constantly until the mixture thickens. Remove from heat and beat in the butter.
Cut a divot into the top of each cupcake and fill with champagne cream. Fill so that the filling is almost level to the top.
Champagne Frosting:
1 cup plus 1 tbsp. champagne or prosecco
2 sticks of butter softened
2 1/2 cups confectioners' sugar
Place 1 cup of champagne in a small saucepan. Simmer over medium-high heat until reduced to 2 tablespoons. Transfer to a small bowl or condiment cup and allow to cool.
In the bowl of a stand mixer fitted with the whisk attachment, cream softened butter and powdered sugar together. Once the frosting is thick and fluffy, pour in the reduced 2 tbsp. champagne plus 1 tbsp. champagne from the bottle and mix well.
Decorate with fun sprinkles... or take them to your party and bring several small bags of Pop Rocks. Before each guest takes a cupcake, sprinkle them with Pop Rocks. This will simulate the fizz that champagne has! Guests gets a sweet treat with a surprise fizzzz!
Tuesday, October 22, 2013
World's Best and Grandpa's Favorite Apple Pie

I followed 
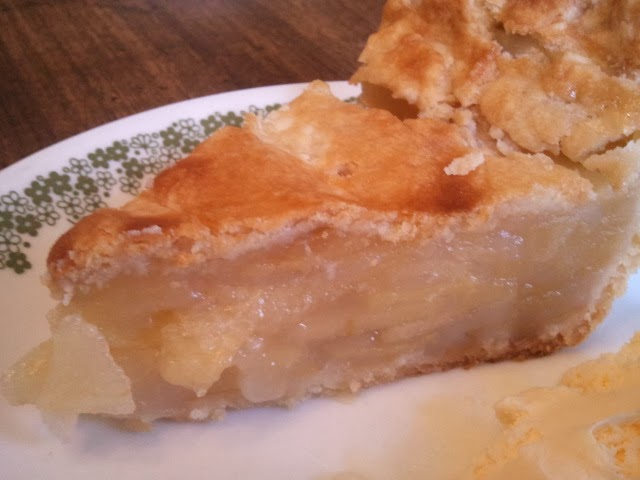
Alton Brown's recipe , even layering the apples like he suggests, see the picture beside this. This pie is just awesome, light, flaky crust and delicious apple filling. I beg of you, make this pie!
Ingredients
For the crust:
6 ounces unsalted butter, cut into 1/2-inch pieces
2 ounces vegetable shortening, cut into 1/2-inch pieces
5 to 7 tablespoons Apple Jack
12 ounces all-purpose flour, approximately 2 3/4 cups, plus extra for dusting
1 teaspoon table salt
1 tablespoon granulated sugar
For the filling:
3 to 3 1/2 pounds apples, mixture of Granny Smith, Honeycrisp, Braeburn and Golden Delicious, about 6 large apples
1/2 cup sugar, divided
3 tablespoons cornstarch
2 tablespoons apple jelly
1 tablespoon apple cider
2 teaspoons freshly squeezed lime juice
1/4 teaspoon kosher salt
Directions
For the crust:
Place the butter, shortening and applejack into the refrigerator for 1 hour.
In the bowl of a food processor, combine the flour, salt and sugar by pulsing 3 to 4 times. Add the butter and pulse 5 to 6 times until the texture looks mealy. Add the shortening and pulse another 3 to 4 times until incorporated. Remove the lid of the food processor and sprinkle in 5 tablespoons of the applejack. Replace the lid and pulse 5 times. Add more applejack as needed, and pulse again until the mixture holds together when squeezed. Weigh the dough and divide in half. Shape each half into a disk, wrap in plastic wrap and refrigerate for at least 1 hour and up to overnight.
For the filling:
Peel and core the apples. Slice into 1/2-inch thick wedges. Toss all of the apples with 1/4 cup of the sugar, place in a colander set over a large bowl and allow to drain for 1 1/2 hours. Transfer the drained liquid to a small saucepan, place over medium heat and reduce to 2 tablespoons. Set aside to cool. Toss the apples with the remaining sugar, cornstarch, jelly, cider, lime juice, and salt.
For assembling and baking the pie:
Preheat oven to 425 degrees F.
Remove one disk of dough from the refrigerator. Place the dough onto a lightly floured piece of waxed paper. Lightly sprinkle the top of the dough with flour and roll out into a 12-inch circle. Place into a 9 1/2 to 10-inch tart pan that is 2-inches deep. Gently press the dough into the sides of the pan, crimping and trimming the edges as necessary. Set a pie bird in the center of the bottom of the pan.
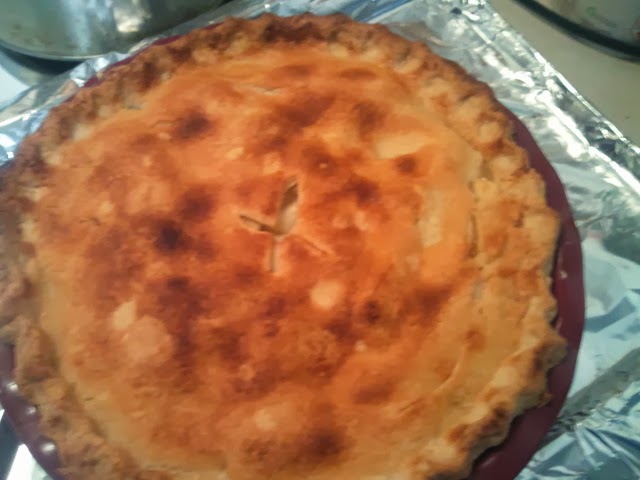
**If you're using an electric oven with coils on the bottom of the oven, place the pie on the sheet pan on the lowest rack over the coils, NOT directly on top of them.
Strawberry Cupcakes

I decided that I needed to stick with the theme of the party and go with something strawberry. The only problem with these cupcakes was that my strawberry butter cream broke, meaning that it wasn't light and fluffy like it should have been, I think I over whipped it. But this recipe is something that you definitely need to try, they were a huge hit and went really fast. People raved about the light lemon tang and fresh strawberries in the actual cupcake itself and the strawberry butter cream was good enough to eat with a spoon.
Ingredients
1 box of Betty Crocker Butter Cake mix
Butter, eggs, and water called for on the cake box
1 1/2 cups finely diced strawberries
1 tsp of finally minced lemon zest
1 Tbsp of Lemon juice
Frosting
1/2 cup butter, softened
1/8 tsp salt
1 (16 oz) package powdered sugar
1/2 cup of fresh strawberries, chopped
additional strawberries to garnish
Directions
Heat the oven to 350 degrees. Put liners in the cupcakes pans. Finely dice 1 1/2 cups of strawberries and set them aside. Open the cake mix and take two Tablespoon of dry cake mix out of the bag, put into a small bowl. In a big bowl, add the remaining cake mix, water, butter, eggs, lemon juice, and lemon zest. Mix according to the package directions. Once that is accomplished, add the reserved dry mix to the strawberries and mix to coat the strawberry pieces (this will keep the strawberries from sinking to the bottom of the cupcake). Add the strawberries to the cake mix and fold them in gently. Scoop the cupcakes batter into the cupcake pans with a large ice cream scoop, this gives you even cupcakes and better baking. Gently pick up the trays to about six inches above the counter and drop them gently on the counter. This gets all the air bubbles out of the cupcakes. Place in the oven and bake for the time on the box. To check if they are done, insert a toothpick in the center of the cupcake and make sure it comes out clean.
Let the cupcakes cool completely and then frost.
For frosting. Dice the strawberries into very fine pieces. In a large bowl, put the softened butter, salt, powdered sugar and strawberries. Beat until smooth.
To garnish, slice a strawberry in half, place cut side down on a paper towel for 5 minutes to absorb the juices. Then garnish and serve!
Subscribe to:
Posts (Atom)