Search This Blog

Thursday, March 29, 2012

Light as Air Lemon Cookies

With the start of unseasonably warm weather a week or so ago, I decided that I needed to bring cookies to one of my classes.  Since I only had an hour until class, I knew cookies from scratch were probably not an option, so I turned to my pantry and dry cake mixes.  Chocolate sounded too heavy, Vanilla too boring, but Lemon, I felt that that should hit the spot.  Colorful and bright, I figured the lemon flavor and bright color would be perfect for a spring day.  Sort of following the recipe from Duncan Hines, I came up with Light as Air Lemon Cookies, a perfect treat for a day that needs some sunshine. 
I modified this recipe a bit after I read some suggestions that were posted on the website.  Instead of oil I added a cup of light sour cream and a tablespoon of room temperature butter.  The texture was light, airy, butter but tart, a perfect lemon cookie.  My classmates raved about them and they couldn't be simpler! 

Light as Air Lemon Cookies

1 box any flavor Duncan Hines cake mix (I used Lemon)
2 eggs
1 cup sour cream
1 Tbsp room temperature butter

Add 1cup sour cream, 1 tablespoon butter and two eggs to one box of cake mix. Add chips, nuts, and flavorings if desired. 
Drop by teaspoonfuls on a cookie sheet. Bake at 350 degrees for 10-12 minutes. Cover with powdered sugar when cooled and serve!

Blackberry Custard Pie


 Grandpa also hates cakes.  I'm not sure what it is about the consistency of cake, but he's never liked it.  It's probably the one sweet thing he's doesn't enjoy.  But the man LOVES pie.  I'm pretty sure that pie is probably his second favorite food group, especially berry pies.  I can remember being a little kid and Grandma would make elderberry pie, Grandpa's favorite.  Well being short of elderberry bushes here in State College, I decided raspberries would make a delicious pie.  So I found what looked to be a scrumptious looking raspberry custard pie.  However, when I went to the grocery store to pick up raspberries, $3.99 a package was a little out of my price range.  Instead of turning to frozen, I looked at the blackberries, which were much more manageable at $1.99 a package.  (I splurged a little, I figure you only turn 89 once.)
With an alteration or two and some combining, the Blackberry Custard Pie was born.  It's gorgeous and delicious and not a lot of work.  I will warn you though, the baking process took much longer than expected.  The recipe says to bake for 10 minutes at 400 degrees, which I did, but then it says to turn it down to 350 and bake for 40-50 minutes.  Mine ended up taking an hour and a half!  I'm not sure if I used a bigger pan than the original recipe did or what, but my best advice is to cook until a knife inserted in the center comes out clean. 
I also changed the top of this pie if you look at the recipe versus my pie.  I decided that instead of a crumb topping I wanted to try a fruit glazed topping.  So go ahead and either try the crumb topping or the fruit glazed top.  I'll give you my recipe for the fruit glazed top, but feel free to try the recipe with no changes, it will still be delicious.
Before baking

Blackberry Custard Pie

 Ingredients
  • Pastry for single-crust pie (9 inches)  (I used store bought since I'm not a great pie dough roller)
  • 3 eggs
  • 2 cups sugar (My berries were pretty sweet so I only used 1 1/2 and it was sweet enough, don't be scared to taste it to see if it needs more before you add the eggs)
  • 1/2 cup all-purpose flour
  • 1/3 cup evaporated milk
  • 2 teaspoons vanilla extract
  • Dash salt
  • 5-1/2 cups fresh or frozen blackberries  (or your favorite berry)

Topping
2 cups of fresh blackberries
1/2 cup sugar
1 cup water
After baking before adding the fresh berry topping
2 Tbsp cornstarch
2 Tbsp corn syrup


Directions
Line a 9-in. pie plate with pastry; trim to 1/2 in. beyond edge of plate. Flute edges; set aside. In a large bowl, beat eggs. Add the sugar, flour, milk, vanilla and salt; mix well. Gently fold in blackberries . Pour into crust.
 Bake at 400° for 10 minutes. Reduce heat to 350°; bake 45-50 minutes longer or until a knife inserted near the center comes out clean.  While still warm, press the blackberries into the top of the pie, pushing down gently so that the berries sink gently into the pie. 
Meanwhile, bring the water, corn syrup, cornstarch and sugar to a boil in a pan.  Let cool for a few minutes (just so it's not boiling) and then coat the berries with the glaze using a basting brush.  Let the pie cool for several hours and then slice and serve.  Don't forget to refrigerate it after eating!
This pie looks so elegant but is really very easy to make. 
yummmmmm 

Raspberry Custard Pie Recipe

Chocolate Fudge

My grandpa turned 89 this past week and had requested that I spend no money for his birthday.  In a firm tone he told me he had everything he could possibly need and I shouldn't do more than mail a card to him for his special day.  Well, I love birthdays and in my mind everyone deserves presents, so my challenge lay in not spending money but coming up with a stellar birthday present. 
Grandpa loves sweets; I swear sugar is a food group to this man.  He probably goes through a box of cookies a day.  Christmas, birthdays, and other holidays the family buys him those bags of mini candy bars, boxes of cookies, chocolates and anything that contains sugar.  For example, this Christmas we bought him 5 bags of the mini chocolate bars, three boxes of chocolates, a giant tin of cookies, plus our homemade cookies, he was out by Valentine's day.  So since Easter is the next holiday with sugary goodies, I decided that cookies and fudge would be the perfect gift. 
Let me tell you about my previous fudge making experiences.  I'm a good cook, by some would even be considered an excellent cook but fudge has been my undoing.  My family loves good fudge and countless times I have failed in this endeavor.  One time I failed bad enough that I had to throw out the pan, I'd melted the metal on the bottom.  Other times my fudge was grainy or did not set, needless to say, fudge was my nemesis. 
With much trepidation and spoon in hand, I set out to battle the demon called fudge.  The first thing I needed was a recipe.  I decided that I wanted something simple without a lot of fuss.  I went to the Foodnetwork site and typed in easy chocolate fudge.  The first recipe to pop up was Foolproof Chocolate Fudge by Eagle Brand.  I clicked on the link and low and behold, it happened to be the fudge recipe by Alton Brown.  Now, I love Alton Brown.  He cooks like my mother does.  When she was teaching me to cook she would always explain the science behind why we were adding certain ingredients and what purpose they would serve.  I always thought it was silly, but I now understand why she did it.  I can make up a recipe or substitute ingredients based on their purpose in a recipe with ease, thanks to my mom.  (Side note here, I wish she had made it as fun as Alton does, maybe I would have paid even more attention.) 
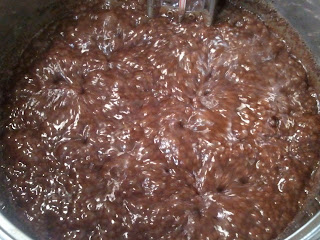
fudge in the boiling process
The ingredients were easy and pretty traditional for fudge, sugar, chocolate, evaporated milk, butter and vanilla as well as a candy thermometer and patience.  This recipe took even more of the last ingredient, patience, because I had to wait 10 minutes for it to cool down.  Let me tell you though, TOTALLY WORTH IT!  BEST FUDGE I HAVE EVER MADE!!!!!! 
So with no further ado, here's the best fudge ever recipe.  Just follow the directions to the T and you too will have perfect fudge. 

Ingredients:

  • 2 3/4 cups sugar

  • 4 ounces unsweetened chocolate

  • 3 tablespoons butter, plus more for greasing pan

  • 1 cup half-and-half

  • 1 tablespoon corn syrup

  • 1 tablespoon vanilla extract

  • 1 cup chopped, roasted nuts, optional

  • Grease an 8 by 8-inch pan with butter. In a heavy-bottomed saucepan, combine the sugar, chocolate, 1 1/2 tablespoons of the butter, half-and-half, and corn syrup. Over medium heat, stir with a wooden spoon until sugar is dissolved and chocolate is melted. Increase heat and bring to a boil. Reduce heat to medium-low, cover, and boil for 3 minutes. Remove the cover and attach a candy thermometer to the pot. Cook until the thermometer reads 234 degrees F. Remove from the heat and add the remaining butter. Do not stir. Let the mixture cool for 10 minutes or until it drops to 130 degrees F. Add vanilla and nuts, if desired, and mix until well-blended and the shiny texture becomes matte. Pour into the prepared pan. Let sit in cool dry area until firm. Cut into 1-inch pieces and store in an airtight container for up to a week.

    Monday, March 19, 2012

    Garlic Sausage Spaghetti Sauce

    When I was at the grocery store this week I picked up some Irish O'Garlic Johnsonville Sausages in honor of St. Patrick's Day even though I'm not Irish.  So Saturday morning dawned and I was in the mood for something comforting, hearty and not to mention delicious.  I decided that I'd make spaghetti sauce using the Irish O'Garlic Sausage and some homemade tomato sauce that my mom and I had canned this past summer.  So using whatever I could find in the refrigerator and spice pantry, I put together this delicious and comforting sauce.  I should also mention that it made my house smell so good!!

    1 quart of homemade tomato sauce (you can also use store bought, but just make sure it's unflavored)
    1 pkg of Irish O'Garlic Sausage or garlic flavored sausages
    3 cloves of garlic, minced
    1 medium onion, diced
    1 Tbsp of dried basil
    1 Tbsp oregano
    1/2 cup shredded Parmesan cheese
    1 Tbsp Pinch Perfect Parmesan Herb
    1 Tbsp Pinch Perfect Roasted Garlic and Bell Pepper
    2 tsp garlic powder
    2 tsp onion powder
    2 Tbsp of sugar
    1 Tbsp olive oil
    1 cup white win
    salt and pepper to taste

    Cut sausage links into bite size pieces with a serrated knife.  In a large soup pan, add 1 Tbsp olive oil and add the sausage to the pan.  Cook until brown on all sides and almost totally cooked through. 
    Take sausage out of pan and place on paper towel to drain.  Drain the pan so there is only about 1 Tbsp of oil left in the bottom as well as all the brown bits.  Add the onions and saute until soft,  then add the garlic, basil, oregano and saute until fragrant (about 3 minutes or so).  Put in the cup of wine and scrap all the bits off the bottom.  Add the tomato sauce, garlic and onion powder, sugar, salt, pepper, Parmesan cheese, Parmesan and Herb seasoning, Roasted Garlic and Bell Pepper seasoning and add the sausage back into the pan.  Simmer on low, stirring occasionally, until the sauce reaches the consistency you desire and then serve over pasta.  Enjoy!

    Sunday, March 18, 2012

    Curried Chicken Salad

    My first meal back I decided to make a chicken salad.  I'd bought a rotisserie chicken and decided that I wanted something spring-like and delicious!  So I went hunting through recipes and discovered Eli Krieger's recipe for Curried Chicken Salad.  I made a few changes to the recipe but for the most part I followed it pretty closely.  I have made quite a few chicken salads in my life and this is by far the best! I highly suggest trying this recipe when you want some chicken salad and serving it on either a toasted English Muffin or some salad greens. 

    Recipe is as follows
    1 1/4 pounds boneless skinless chicken breast halves  (I used a rotisserie chicken and shredded it)
    1/4 cup sliced almonds
    1/2 cup nonfat plain yogurt (I used plain Greek Yogurt and it made it thick and delicious!)
    2 tablespoons mayonnaise
    1 teaspoon curry powder
    1 cup halved red grapes (I used green, but they were a little too tart)

    Roast the chicken breasts with salt and pepper in a 350 degree oven until they are done and then let them cool and shred them. 
    Toast the almonds in a small dry skillet over medium-high heat until fragrant and beginning to turn golden, 2 to 3 minutes.
    In a large bowl, stir together the yogurt, mayonnaise, and curry powder. Fold in the chicken, grapes and season, to taste, with salt and pepper.
    Let sit, because it's better once everything has absorbed the flavors.  Serve over greens or an English Muffin.

    Catching up

    Hi everyone,
      I'm so sorry I've been behind in blog postings.  School, work and life got a little crazy and then spring break happened.  My brother lives outside of New Orleans, so I love visiting him for spring break and besides the warm weather, the food is AMAZING!  My brother loves food as much as I do, so he and his friends have found some pretty awesome places to eat in and around New Orleans.  It's a good thing he loves me because I'm always wanting to eat out when I go down to visit him and it's my treat! 
    This time, Craig was working midnights so we only got to eat out a few times, but the places he took me were sooooo good! We went to a place called The Cove, which we've gone to before and their food is just classic New Orleans.  Boiled shrimp, spicy and fresh just can't be beat!  Boiled shrimp is fresh shrimp that they throw in a pot of boiling water along with corn and potatoes.  They use a boil spice that is a combination of Old Bay and other seasonings, so the shrimp are sweet but spicy.  You order them by the pound and they come whole, with the shell on, so snap the head off, peel them and eat the tails.  Combined with some sweet tea, HEAVEN!  Be warned though, the place always has a line and they close at 9pm, so come early and be ready to wait.  There are only about 30 tables and a bar in the entire place. 
    My next favorite place, which was brand new to me, was Kenner Seafood.  This place was great!  It also has about 30 tables and a bar and I highly suggest that YOU NEED TO EAT HERE!  The food is so good and the portions are HUGE!  My brother and I ordered crab au gratin and crab saute as an appetizer.  The portions were huge and I finished about 1/3 of the crab saute and one piece of the crab au gratin.  We both ordered dinner too, knowing that we would probably be taking leftovers home.  Craig ordered crayfish marie and I ordered shrimp marie.  This marie was served over angel hair pasta and included fried crawfish/shrimp and a cream tarragon sauce with a hint of spice!  I finished about a 1/4 of mine and so my brother had two days of delicious leftovers! 
    So coming back to Ohio was a little bit of a disappointment.  I flew back in a cold rainstorm and then went for a two day Young Agricultural Professionals conference in Dublin, Ohio.  It was interesting and informative, and I'm very glad that I went. I hope I can become more active in that organization. 
    So that explains a little bit of why I haven't posted, but I'll do better now that I'm back at school.