Search This Blog

Friday, April 18, 2014

Meg's Rainbows

    I have a good friend named Meg, who has definitely been going through a rough patch.  She however, has always been the bravest and funniest person I've ever had the pleasure of knowing.  It had been a while since I had seen Meg, and we just ran into each other at my new job last week.  She filled me in on what had been going on and I immediately decided that she NEEDED cupcakes.  Well, there is only one hold up to that need.  Meg is allergic to peanuts, BADLY!  As in, breathe in a speck of peanut and she's turning blue on the floor.  While I've often joked with her that I find this somewhat amusing (and accidentally almost caused her to turn blue because of a granola bar, I didn't mean it, HONEST) it causes some problems when making my tradition cupcakes.  I couldn't used a box mix because if you read carefully on the side, it says "Manufacturing in a facility with nuts".  Not what kind of nuts (people or tree), but just manufactured with nuts.  Really reassuring in a not so reassuring way.  
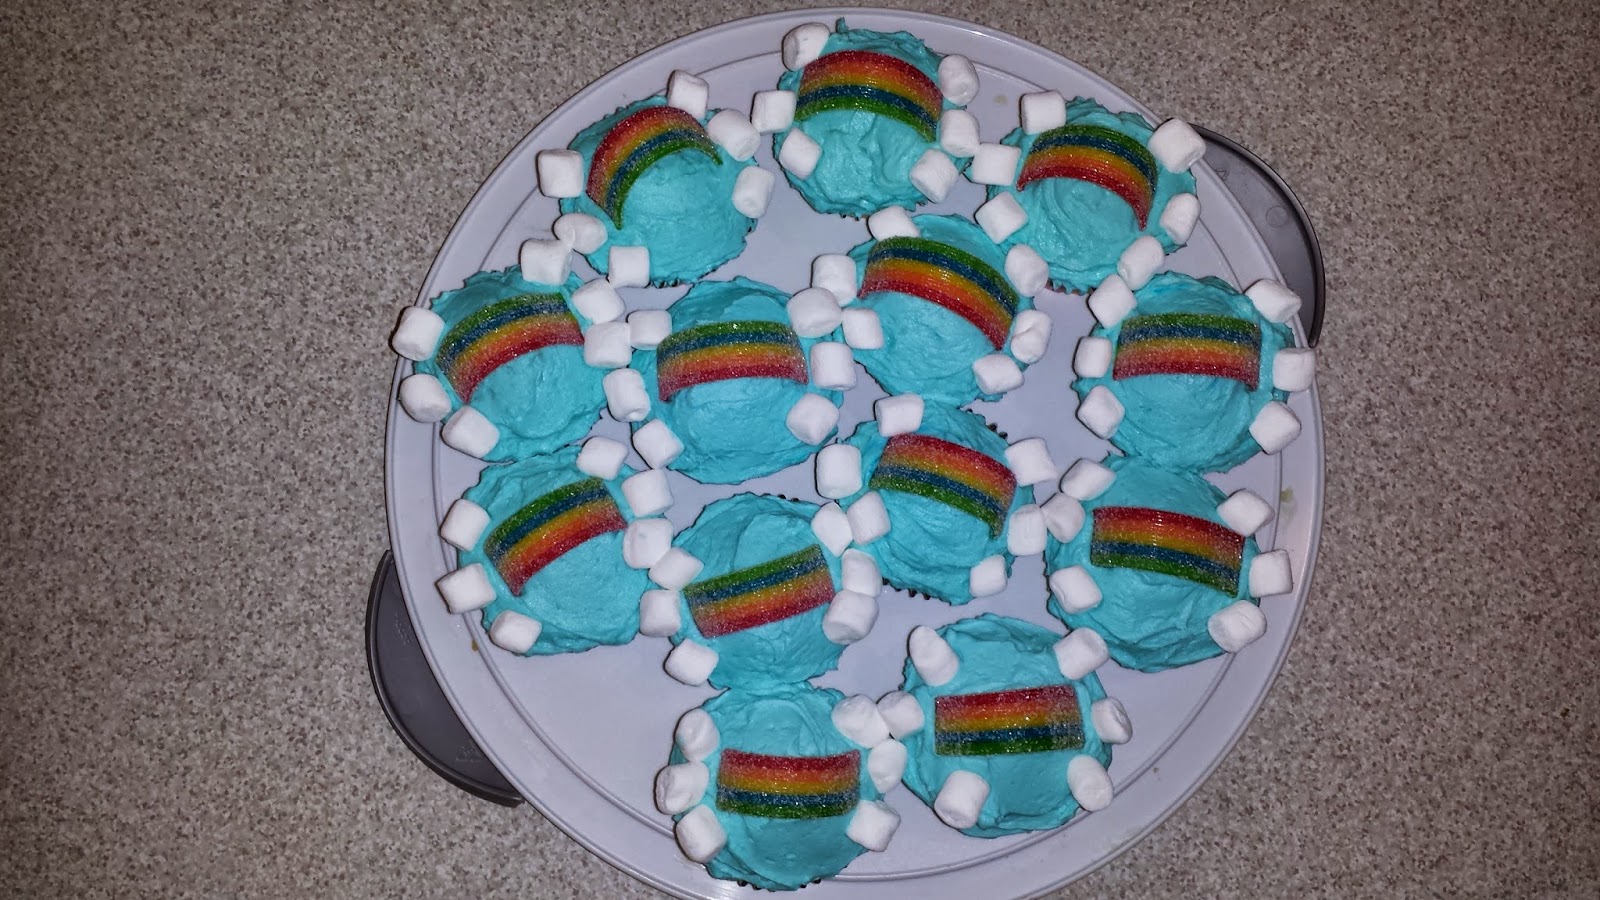
    So how to combat this problem..... homemade orange cake!  Meg's favorite flavor is orange, so bingo, orange homemade cupcakes with an orange frosting.  Perfect!  And since there is always a rainbow after every store, the rainbow theme worked beautifully.  The original recipe came from the Cooking Channel.  Since I didn't have an buttermilk, I made my own.  Simply pour however much milk you need, and for each cup, add one tablespoon of an acid (either white vinegar or lemon juice).  Let sit for 5 minutes and you've got buttermilk!  

Orange Cake 

Cake ingredients: 

  • 4 tablespoons butter, softened


  • 1 cup sugar
    • 1 egg
    • 1 teaspoon orange extract
    • 1/4 teaspoon vanilla extract
    • 1/3 teaspoon baking soda
    • 2/3 teaspoon baking powder
    • 1/4 teaspoon salt
    • 1 teaspoon orange food coloring, optional
    • 1 1/3 cups all-purpose flour
    • 1 cup buttermilk


  • For the cake: Preheat the oven to 350 degrees F. Line a cupcake pan with 12 paper liners. 
  •       Using an electric mixer, beat the butter and sugar until light and fluffy. Add the egg, orange extract, baking soda, baking powder, salt and food coloring if using, beating well after each addition. With the mixer on low speed, alternately add the flour and buttermilk in three additions. Scrape down the sides of the bowl as needed. Using a large ice cream scoop, divide batter evenly in cupcake liners and bake until a toothpick inserted into a cupcake comes out clean, 18 to 20 minutes. Allow the cupcakes to cool before adding the filling and frosting. 

    Frosting Ingredients :
     3 cup confectioner's sugar
    1 cup butter, softened
    1 teaspoon orange extract 
    1 to 3 tablespoon heavy cream or whole milk
    light blue food coloring

    In a standing mixer (If you don't have one, a bowl will do)  fitted with a whisk, mix together sugar and butter. Mix on low speed until well blended and then increase speed to medium and beat for another 3 minutes.
    Add orange, cream/milk and food coloring, continue to beat on medium speed for 1 minute more, adding more cream if needed for spreading consistency.

    decorations are mini marshmallows and the rainbows are Airheads Extreme Sweetly Sour Belts, which I bought at Sheetz and cut to make rainbows.


    Light as a Cloud and Tasty Coconut cake

          So do you ever get those whims to just bake something?  No, hmmm well, I do!  In fact, I get them quite frequently.  One of my favorite flavors is coconut.  Especially with spring in the air.  I like to think that the smell of coconut takes me back to the beach in Hawaii.  Bright sunshine, yellow sand, and blue, blue water.... oh and don't forget the smell of coconut, which to me always seemed to linger on the breeze.  (Could have been my sunscreen, not sure)  However, coconut is a sure way to bring a smile to my face.  
             On this particular day, coconut cake was my goal.  Word of warning here, come of the coconut cake recipes out there can be INTENSE and need 1,000 ingredients.  This one doesn't, however, make sure you've got the stuff on hand before setting out to make this cake.  The original cake recipe is from Add A Pinch blog and the frosting recipe if from Paula Dean   Let me tell you, this cake won raves reviews not only from myself but from my neighbor!  

    Coconut Cake

    Ingredients for the cake:
    Sorry this is a bad photo, but it was tasty!
    1 cup (2 sticks) butter, softened
    1/2 cup vegetable shortening
    3 cups granulated sugar
    5 eggs, room temperature
    3 cups all- purpose flour
    2 teaspoon baking powder
    1/4 teaspoon salt
    1/2 cup coconut milk (USE MILK not Creme) 
    1/2 cup whole milk
    2 teaspoons of coconut extract

    Ingredients for the frosting:
    1 1/2 cup sugar 
    1/4 teaspoon cream of tarter or 1 Tbsp white corn syrup
    1/8 teaspoon salt 
    1/3 cup of water 
    2 egg whites 
    1 1/2 teaspoon coconut extract 

    Instructions: 
    Preheat oven to 350ยบ F. Prepare three 9-inch round cake pans with nonstick baking spray and flour, making sure to remove all excess flour.
                Then, cream together butter and shortening until light and fluffy.  Slowly add sugar one cup at a time, making sure to fully incorporate each cup before adding another. Add eggs one at a time, making sure to fully incorporate each egg before adding another.
                Next, Sift together flour, baking powder, and salt. Pour milks and coconut into measuring cup and whisk together with a fork. Add to butter mixture alternately with milk mixture, beginning and ending with dry ingredients.  Stir all ingredients until well combined. 
               Pour as evenly as possible between cake pans and place pans into oven. Bake for 25-30 minutes, or until a toothpick inserted in the center comes out clean. Remove and allow to cool slightly in cake pans for about 5 minutes, then cool completely on a wire rack.

    Frosting 
    Put sugar, cream of tarter or corn syrup, salt, water, and egg whites in the top bowl of a double boiler.  Beat with a hand held mixer for 1 minute.  Place pan over the boiling water, making sure that the pan does not get any water in it or that it does not touch the water.  (The frosting could be grainy if you get water into it).  Beat constantly on high speed for 7 minutes.  Add in coconut extract.  
      
           Once the cake has cooled, frost in between the layers and the outside of the cake with the 7 minute frosting.  You can cover the cake in shredded coconut if you like, I chose not too, but it was just because I was out of shredded coconut.  Cut  huge slice and enjoy!  Hopefully you too will feel like a big, puffy white cloud floating over a Hawaiian beach while eating this piece of cake!  
     

    Applejack Vanilla cupcakes (Blue/White game cupcakes)

           So here at Penn State University, we have an annual spring tradition called the Blue/White game.  The Blue/White game is a Penn State tradition where the the football team scrimmages against themselves as a preview for the next year.  Really, it is just an excuse for football starved PSU fans to come out, tailgate, and see the football team.  After a long, cold, snowy winter, this was a very anticipated weekend.  This year, the weather was perfect, low 60s, sunshine, blue skies and a light breeze.  Being in the center of Pennsylvania and in the month of April, the weather does not always cooperate.  Last year, Blue/White weekend was cold, snowy/rainy, and not very fun.  This year however, Mother Nature decided we needed a break and gave us a beautiful weekend.  (We paid for it however, Tuesday it rained/snowed and then was cold the rest of the week).
           My friend decided to have a tailgate to celebrate her daughter's final game at Penn State.  So me being the baker decided to whip up a fun, tasty, and slightly naughty cupcake.  I had a French vanilla cake mix on hand, but couldn't decide what flavors to add.  After much debate with my good friend Jamie, we decided that Applejack and french vanilla would take a tasty combination.  Jamie also came up with the brilliant idea to dye some of the cake batter blue and create the blue/white combination.  What came out were brilliant and very tasty blue/white cupcakes, the perfect addition for any football tailgate!


     Ingredients for Cupcakes:
    1 Betty Crocker French Vanilla Cake mix
    1 1/4 cup Applejack (instead of water)
    1/3 cup oil
    3 eggs
    food coloring of choice


    Ingredients for Applejack Frosting:
    3 cups of powdered sugar
    1 cup butter, softened
    1 teaspoon vanilla extract
    1 to 3 tablespoons Applejack
    food coloring of choice

    Instructions for cupcakes:
        Preheat oven to 350 degrees.  Place cupcake lines in a cupcake pan.  Pour the dry cake mix into the pan, add the eggs, oil, and Applejack (in place of the water).  Mix on low until combined, then beat for 2 minutes on high speed.  If you want to do the color scheme like I did, divide the batter in half.  Keep one half white (or color it a different color) and then color the other half blue (or whichever color you like).  I used the Neon food coloring for this cupcake and they came about vibrant and bright! Taking a large ice cream scoop, first scoop one color into the bottom, then scoop the second color on top.  Using an ice cream scoop will give you uniform cupcakes.
    Bake the cupcakes 17-20 minutes or until a toothpick comes cleanly out of the center
       
    The alcohol will cook out of the cupcakes but leave a nice apple flavor.  Warning!  When you go to check of the cupcakes are done, open the oven door a bit, and then pause a moment before leaning inside!  Because of the alcohol in the cupcakes, the steam released from the cupcakes will be very hot!  Don't burn your face! 

    Remove the cupcakes from the pan and while they are cooling, make the frosting.

    Frosting directions:
    Take the 1 cup of softened butter, slowly mix this butter adding the 3 cups of sugar gradually.  I normally add it by the half cup.  About half way through, add the vanilla and 1 Tbsp of the Applejack.  Continue to beat the frosting.  Right before you put in the last of the powdered sugar, add 1 Tbsp more of Applejack. You can add more Applejack depending on that consistency that you would like the frosting to be.  Less Applejack = stiffer frosting, more Applejack = looser (more spreadable) frosting.

    Frost and serve.  The flavor reminds me of apples with vanilla ice cream!  yummmmm

    Monday, January 20, 2014

    Peppermint Chocolate Snow caps

     
     I needed cookies to take to a Farm Bureau Christmas Party.  My requirements were that the cookie be something chocolate and something festive, meaning I wanted something with peppermint and chocolate. When I was testing out this recipe, the washing machine repairman was here replacing the door mechanism in my washer.  So I whipped them up while he was working and sent him on his way with a plate full of cookies and a smile.  The whole apartment smelled like warm chocolate and peppermint, a wonderful combination on a cold winter day.  These cookies were easy and fun and the dough kept really well in the freezer.  In fact, tomorrow I'm going to defrost that dough and make a few more of these cookies for a friend.  You can make these cookies with as much peppermint or as little peppermint as you like; I happen to life peppermint a lot!  Reminds me of the crisp smell of the outside and the warmth of hot cocoa.  Give these cookies a shot and you'll be pleasantly surprised at how easy and tasty they are.  While you're at it, make a double batch and put the other half in the freezer.  Take them out when you need a lift on a cold, wintry day.  The recipe came from the blog,The Nest Chapter .

    Ingredients: 
    1 1/2 cups all purpose flour
    1 1/2 teaspoons baking powder
    1 1/2 cups milk chocolate chips
    6 tablespoons butter, softened
    1 cup granulated sugar
    2 eggs
    1 1/2 teaspoons vanilla
    1/2 teaspoon mint flavoring (or a bit less if you want a milder flavor)


    1/4 tsp salt  
    Powdered sugar for rolling 

    Directions: 
    Preheat oven to 350 degrees.  In a double boiler melt the chocolate chips and butter. Remove the chocolate and butter from the heat.  Beat in granulated sugar until combined, then beat in eggs, vanilla and mint flavoring. Add in flour, baking powder, and salt, stirring until combined.  Shape dough into 1 inch balls using a small ice cream scope. Roll balls in powdered sugar. Place on a non-stick baking sheet about 2 inches apart. Bake in preheated oven for 9 1/2-12 minutes.  9 1/2 minutes make a soft cookies, so I suggest 9 1/2.  Cool for a few minutes on a baking sheet.
    Makes about 40 cookies.


    Fruitcake bars (no rolling your eyes, these are DELICIOUS)

         I have never in my life had fruitcake, NEVER!  I had heard the same horror stories that I'm sure everyone else has heard.  Fruitcake is awful.  Fruitcake is hard.  Fruitcake bounces.  Fruitcake is similar to a Twinkie, they never rot.  Avoid fruitcake at all cost.  Well, let me tell you, THOSE ARE LIES!!!!  LIES I TELL YOU!  This fruitcake bar recipe if from Taste of Home and it is delicious and amazing.  If your memory is tainted by bad fruitcakes of the past, please put away your demons and try these bars.  They are moist, fruity, nutty and mouthwatering.  These may be my new Christmas wooing cookie.  I'll be honest, making these cookies was a push from Joy my upstairs neighbor, who claimed that she loved fruitcake.  I thought she was crazy.  Reluctantly I made these bars for her as a Christmas present and they were delicious.  Give them a try!  
        Since I had never made these before, I followed the recipe with fidelity and let me tell you, I wouldn't change a thing.  The only major change I made was to toast the walnuts, which made them taste rich and took away the slightly bitter bite.  
       
              Ingredients: 
       3/4 cup butter, softened 
       1 3/4 cups packed brown sugar 
       3 eggs 
       1 Tbsp vanilla extract 
       1 1/2 cups all-purpose flour 
       3 cups, toasted, chopped walnuts 
       1 1/2 cup chopped candied pineapple 
       1 3/4 cups red and green candied cherries, halved
       2 cups pitted dates, chopped
      
    Directions:
       First, turn the oven to 350 degrees.  Spread the walnuts out on a cookie sheet and bake them until they smell fragrant, anywhere from 8 to 15 minutes.  Check on them constantly and make sure to mix them around.  You don't want them to burn.  When they are done, remove them from the oven.  Wait until they cool a bit and then chop.  Then, in a large bowl, cream the butter and brown sugar until light and fluffy. Add eggs, one at a time, beating well after each. Stir in vanilla. Add flour and walnuts; mix well. Add some of the pineapple, cherries and dates, mix them through thoroughly.  Spread evenly into a greased 9x13 inch baking pan. Sprinkle with pineapple, cherries and dates; press lightly into dough.
    Bake at 325° for 45-50 minutes or until lightly browned. Cool on a wire rack. Cut into bars. Yield: 8 dozen.

    Marshmallow Chocolate Cupcakes

       
    In November (yes, yes, I know it's been a while) I made cupcakes for a good friend's birthday.   Her name is Joy and she's my upstairs neighbor, along with her daughter, Nicole.  It's a long story but I yelled at them when they were moving in and made up for it with brownies.  Since then, we've become very good friends who share our struggles over coffee and my baked goods.  Joy makes a killer homemade chicken noodle soup and is a respected baker in her own right (she ran/runs a catering business when she's not masquerading as a doctoral student).  Together though, over strong coffee and baked goods, we serve as each others sounding boards, idea generators and sometimes just a place to vent or enjoy the silence.
         Her birthday was in November and I decided to go simple but delicious for her birthday.  She enjoys chocolate just like most of us and I figured what goes better with chocolate than marshmallow... The answer is NOTHING!    So Marshmallow Chocolate Cupcakes were born as a birthday present.  This recipe is unique, I would suggest making this recipe on the same day that you make the Kahlua Meringues  because the frosting for these cupcakes doubles as the meringue topping!
         So my normal chocolate cake recipe doesn't work for these cupcakes, it's too flaky and falls apart in cupcake form.  Therefore, I use a regular old box mix cake with some spruced up touches, a delicious filling, and knock your socks off frosting!

        Ingredients:
    Cake
        1 Betty Crocker Dark Chocolate cake mix
        oil called for on package
        coffee, substituted for the water, as called for on the package
        eggs as called for the package
    Filling:
      1 package of Chocolate pudding mix (you can choose the flavor, I chose chocolate for a richer cupcake)
      milk as called for on pudding package
      1/2 tsp coconut extract
    Frosting:
      2 large egg whites  (don't use the already separated kind that you get in a box, they don't fluff right)
      3/4 cup white sugar
     1/4 tsp or large pinch of cream of tarter  (this makes the egg whites hold the whipped air and stay fluffy)
     1/4 tsp vanilla extract 

    Directions:
     Grab a Betty Crocker Dark Chocolate cake mix and pour it into a bowl.  Then, instead of water.... here come the secret, SHHHHHH... instead of water, add STRONG coffee (espresso would work if you don't make your coffee like I do [thick, black sludge that a spoon stands up in]  or instant coffee if you must).  Trust me on this, the chocolate taste is magnificent with this added touch.  Then add the eggs and the oil as called for on the package.  Mix it according to box directions, put cupcakes liners in a cupcake pan, scoop the batter into the pans and bake for the time on the package.  Then let the cupcakes cool, I know it'll be tempting, but back off and let the cool.

        While the cupcakes are cooling, mix up the filling.  Add the pudding mix to a bowl, the 1/2 tsp of coconut extract and the milk.  Mix according to the directions on the package.  Let the pudding set up while the cupcakes cool.  When the pudding cools and the cupcakes are cool, put the pudding into a Ziploc bag and cut a small tip off one of the ends, this will serve as a pastry bag.
        When the cupcakes are cool, use the Ziploc bag to fill the cupcakes.  To fill a cupcake, take either a knife or a cupcake punch, and make a hole in the cupcake.  Fill the hole with the filling.  Make sure that the filling comes to the top of the cupcake, but not over the top, just make it even with the cake.
        When you're ready to frost, make the frosting as follows.  Place a shallow pot on the stove with about 4 inches of water, then place a bowl over the water pot.  A double boiler.   In the bowl over the simmering water, add the egg whites and sugar.   The idea in doing this is that you "cook" the egg whites and dissolve the sugar.  So with that in mind, stir constantly and bring the egg whites up to warm.   I define warm as warm to the touch.   When you touch the egg whites, the "grit" of the sugar should be gone.  Think silky smooth texture. 
        So once your egg whites and sugar are warm and silky take the top bowl off the heat and bring to beat the egg whites with a mixer.  I prefer to do this in my stand mixer because it's nice to be able to turn the mixer up as the egg whites fluff and be able to walk away.  If you don't have a stand mixer, slowly increase the speed while mixing well.    As the mixture begins to fluff, add the cream of tarter and the vanilla extract.  The  mixture will get very white, very fluffy and very glossy.  In order to tell when the marshmallows are done, take a beater and flip it upside down.  If the the peak holds its shape, then your meringues are done! (hint, this is a marshmallowy/meringue type frosting.  Technically it's a meringue, but the texture is more marshmallowy)    GENTLY take a spatula and put the meringues in the pastry or Ziploc bag.  If you're using a pastry bag, a large star tip makes the pretty shape.  Frost the cupcakes with a pretty pattern and place them on a cookie sheet.  Turn the broiler on in your oven or used a kitchen torch and gently brown the meringues.  Don't take your eyes off these meringues or you will burn them and burnt things taste bad!  
        These cupcakes are moist, chocolately, and the frosting tastes like a big marshmallow!  Yumm!

    Kahlua Meringues

         So it's been a while since I updated the blog because I'll be honest, sometimes all the darn writing I have to do pushes updating the blog to the way, far back burner of my life.  Especially around the holidays where I try to spend as much time as I can with my family and friends.  So now that the writing is at least at manageable  proportions, I can spend some time updating this blog with all my delicious recipes.
         This recipe kind of came about by accident.  In a bit, I will post the recipe for Marshmallow chocolate cupcakes, which I made for a friend's birthday;  it turns out that the first frosting recipe I made makes a TON of frosting.  So me being the person I am,  I mixed in a bit of Kahlua and made these absolutely tasty little pieces of heaven.
          Don't be scared of meringues, just don't try to make them on the rainiest, humid day of the week.  Pick a nice, dry day and then make these pieces of heaven.  I really like to make them towards the evening and then let them sit in the oven overnight; they are wonderful with or even in a cup of coffee.  Flavor them with whatever flavor you like, be creative, use a little food coloring; PLAY, meringues are very fun!
          Besides the rule of not making these on the rainiest day of the year, make sure that there are NO YOLKS in your egg whites.  Cracking eggs without getting the yolk into the white is probably the biggest mistake people make.  If you get even a nano drop of yolk into your egg whites, you're whites won't get fluffy and puff up, which makes sad, flat meringues.  So armed with your best set of hands and a nice sunny day, begin your easy meringue journey.
       
       Ingredients:

    3 large egg whites   (don't use the already separated kind that you get in a box, they don't fluff right)
    3/4 cup white sugar
     1/4 tsp or large pinch of cream of tarter  (this makes the egg whites hold the whipped air and stay fluffy)
     1 to 2 tbsp of Kahlua  (pick 2 if you like the flavor of Kahlua, 1 if you're not sure)
    food coloring if you like
     Pastry bag or Ziploc bag
      Star tip

    Directions:  

    Preheat the oven  to 350 degrees.   Place a shallow pot on the stove with about 4 inches of water, then place a bowl over the water pot.  A double boiler.   In the bowl over the simmering water, add the egg whites and sugar.   The idea in doing this is that you "cook" the egg whites and dissolve the sugar.  So with that in mind, stir constantly and bring the egg whites up to warm.   I define warm as warm to the touch.   When you touch the egg whites, the "grit" of the sugar should be gone.  Think silky smooth texture.
        So once your egg whites and sugar are warm and silky take the top bowl off the heat and bring to beat the egg whites with a mixer.  I prefer to do this in my stand mixer because it's nice to be able to turn the mixer up as the egg whites fluff and be able to walk away.  If you don't have a stand mixer, slowly increase the speed while mixing well.
       As the mixture begins to fluff, add the Kahlua and the cream of tarter.  The  mixture will get very white, very fluffy and very glossy.  In order to tell when the meringues are done, take a beater and flip it upside down.  If the the peak holds its shape, then your meringues are done!
       GENTLY take a spatula and put the meringues in the pastry or Ziploc bag.  If you're using a pastry bag, a large star tip makes the pretty shape.  If you're really creative, you can stripe the bag and do all types of fun things to make these pretty.  I'm not that creative and I'm more into function, so these are just white.  Take a cookie sheet and cover it in parchment paper.  Then pipe out the stars.
       Once you've piped out all the stars (hint to this: squeeze the pastry bag to get the right amount of meringue and then release the bag before you pull the bag up), place the cookie sheets with the meringues in the oven and then turn the oven off!  Yes, trust me, turn the over OFF!  Don't open the oven door again until morning or for at least 8 hours.  TRUST ME, DON'T OPEN THAT OVEN DOOR!  If you open the door, the heat rushes out and your meringues are gooey, not crisp.  Your patience will be rewarded!
         So now that morning has come, open the oven, GENTLY peel off your meringues and try not to eat them all!  If you take sugar in your coffee, add a few meringues to your coffee and enjoy!  The crisp on the outside, delicate on the inside little puffs are heavenly!